Pages

Tuesday, August 9, 2011

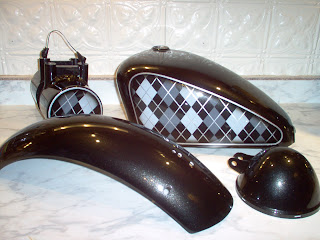
Modified Fender

 So because the back right tail light went out and I needed to replace it I decided to change it up a bit.  I wanted to move the lights up and face more out. I hope this will increase visibility and save my lights in the future.

Oh and I added some accents to match the tank.

All in a days work.

I got bored I suppose and added a jockey shifter to the bike.  I needed to fix the foot shifter from the accident I was in back in April.

I got some 1/2 in. hammered stock and bent 'er right up.

It took some fine tuning to get it just right next to the motor and through the pipes.  I think I still need to tweak just a little to get it right.  It only took me a few hours to pump this out.

Wednesday, August 3, 2011

Welds to be seen

So these are some of the welds I snapped from the frame jig we just finished.

This one has 2 MIG welds at the top of the pic witch are ok and are considered a 1F Tee Joint.  The joint in the center was a 2G Butt on the sides and a 1F Tee on the sides.

Now this one I have to say at first glance will look messed.  You can see the bead is really convex and some serious undercut.  This was done in position 2 x 3G vertical down (either side) and a 4F underneath, w/o filler metal.  This would be a great example on w weld joint to get full pen on the root pass then I could do a filler/cap over it with filler rod. 

Some welding

I'd sure like to say that every time I weld I want it to look pretty and nice.  Sometimes though its just about getting the job done and being able to walk away.  I did a job for some lunch the other day.

This guy (Jared) brings me a BMW seat pan that is swiss cheese, and paper thin.  So I patch the holes.  Pretty simple .0625 Tungsten and some .035 filler wire from my MIG, and some 16ga. backer plates.  Totally not pretty but solid.  I told the guy to make a mold and fiberglass the thing and toss the original.

Axle Plates for Brady

Monday, May 2, 2011

new frame Idea

Sorry for chopping the front.  But this is my first concept.  Any takers?

Thursday, April 28, 2011

Better late than never, MM 4-4-11


Look Right

Look Left

Brady Please this is a family blog!
These were from Moto Monday the beginning of the month, Crazy that the next is just around the corner.

Coffin Tank - Fini


 Well I hope to get it mounted and filled tomorrow.  To bad the weather has turned for the worst.

Friday, April 15, 2011

Seat, Tank, and Bars


So Sorry it's taken so long.  But my bars and tank are done, and I have few pictures here.  This is my redone seat.  So the seat pan that I have been riding around for almost a year is actually the back up pan. The original as done and it looked so stinking stupid I could not live with it.  I was put in contact with a guy named Randy in Springville at Tumbleweed Leather.  He did a bang up job, just what I wanted in the first place. If you need leather work hit this dude up, he is legit!!

 The Tank here is all welded up.  I was placing the petcock in the spot I needed it.  Interestingly it was more thought provoking than expected.  Depending on the angle I put it at would determined how much I could use as a reserve or not.  I had to actually think well do I want to have a decent reserve or basically none at all.
 So I had welded the tunnel on a piece of flat and then tacked that into the tank.  I used my shops air grinder with a cutting disc to trim it out.  I looking into using Brady's nibbler, but time was of the essence.
 Tunnel freed at last.
 I little extra grind work, and then I went back around all the welds, now from what would of been the inside, and I didn't use any filler.  In industry it would be called a backing run, just welding the back side of the weld.  For some thing that will have to hold fluid this should be a must.

 Give me fuel, Give me fire, Give me a gas cap that is centered and I'll be happy.
Don't ask where my camera has been but this is the tank done, check Brady's facebook photo's of his day in the shop with me. But he'd got some good pics of this tank finished.  This here is the front mounts, I went for the hook under in the front to leverage it down.

 Here is the back mount.  I tell ya having the CNC cutter is awesome for some one off parts.

I use a liner called Red Kote, and I love it.  You can get it in a kit like Tank Kreem if you like.  But I have had no problems with it, but make sure you have great ventilation this stuff will knock you out.
The old tank mounted back on cuz I wanted to break the new bars in around the schools parking lot.  50mph straight aways, no biggie.  I love how the feel, the are so much better than the old ones.  Let me tell you this, all you that make bars out there, more power to you!  I had all the material cut I just needed to cope the uprights and it took me from 9 till 4 to get this set all welded and polished.  I was getting pretty pissed at times, just not lining up, not staying straight, errrr I almost threw them across the shop and said forget it.  Sorry this is the only picture of the bars, I was not in the documenting mood at the time, but I think they look good and they ride Great.  Brady's got the clear coat hook up, so hopefully not too much longer and we are in business.


Wednesday, March 9, 2011

Toys

So I finally spent my gift card to HD today.  I needed to cut a hole for my gas cap and I needed new tools.  Well you can start drooling now.   Oh and I don't favor one brand or the other I just buy the best!
YES!!

Friday, March 4, 2011

Progress Progress Progress

So here are the pictures I have been promising

The metal after it was cut out

What the computer says

Tacked together 1

Tacked together 2

Tacked together 3

Just a little peep show of the TIG

Tunnel is being cut to size

Tank was trimmed an inch and then tunneled

It FITS!


What do you think?

Wednesday, March 2, 2011

Tank Progress

Well I was able to cut out the panels for my tank, and weld them together.  I have pics on my phone but I'll get them uploaded sometime before never.  I think I have a new idea to use some of this new TIG brazing I picked up to out line the tank and of course my lightning bolt.  But we shall see.

Tuesday, February 15, 2011

Some Tunnel Action

So how do we take a piece of flat 18 gauge sheet steel, and make it into a tunnel for a new gas tank on a old Honda motorcycle?  A lot of beating, real hard beating!
Flat 18 Ga.
Beat it, strap it down.
Grabbed a plastic hammer from the shop
It started getting hard towards the neck.
The SS zip tie broke so I just got some cheap wire I had lying around and fastened her down

Over all I don't think this turned out bad.


So yeah only took an hour and half to do this.  I had the piece about 5"x24" but that was about 6" to long.  I had no way of cutting it till I found some cold chisels in my tool box.  I struck a line and it broke right in half and now it was 5"x18".  I wish I wouldn't of had to beat the crap out of my back bone, I muffed up that paint something fierce, also you never know what structural damage was caused.  I don't think it affected the integrity of the backbones steel because it was a soft hammer and not metal on metal but you never know.  So now sometime by the end of this week or next I'll cut the tank out, but I would like to ask should I cut out all separate panels and weld them up individually or try and keep as much as possible in flat development and bend it up?

Thanks for looking.

Monday, February 14, 2011

Argyle

Blue Moon Customs did this nice Argyle paint schematic.  I like it but I'm not sure it would work on just any bike.